And now for something completely different, Autodesk the creators of the venerable Autocad and 3Ds max have some out with some interesting software over recent years in the shape of Autodesk 123D suite of apps or programs as I like to call them. These include:
123D: A Free 3D modelling package
123D Catch: Software that creates 3D models from photographs
123D Sculpt: 3D z-brush type sculpting for the iPad
123D Make: Software for creating laminated models, sort of LOM (laminated object modelling) ghetto style, either with a laser cutter or with scissors.
I was aware of Catch and Make but had not really checked out the range, sculpt looks particularly interesting. With 3D printers reducing in price, simple interfaces to make "pretty things" will be essential. I'm also going to check out the basic CAD package to see how friendly that is. Most of my CAD needs are engineering based so it may not suit me but it will be very interesting to see.

Limited workshop space, unlimited interests... "The Littlest Workshop" the bastard child of "The Little House On The Prairie" and "The Littlest Hobo" TV shows. My interests include EDM, CNC, Camping, injection moulding, welding, inventing, casting, bushcraft, composites, 3D printing, micro-RC, ornithopters, optics, microcontrollers, Ukulele, lock picking, cycling, safe cracking, motorcycle restoration ... Maybe tomorrow my projects will be finished?
Wednesday, 2 May 2012
Tuesday, 1 May 2012
"Can" you believe it
This is the third and forth key I have created using impressioning. The lock is a euro cylinder by E*S and I have no key for it at all. I was extremely surprised when the lock opened after very little work, although I guess the fact all the pins are set so shallowly does not detract from the security (and I have to guess) it does not fill me with great confidence. Luckily the lock is in a cardboard box not in a door.
The impressioning was MUCH easier than on the previous lock. The keyway is the same so I think I was wrong to blame the keyway, however, for a given keyway you have some leeway (poet) over where you place the pins, the Yale was further off to the side resulting in just bruising of the edges at first. The E*S gave the text book marks.
Then I was thinking again about the lead edged key, it would be fine to make a mould for a specific keyway but what if something unusual comes up and you don't have a blank and would you ever really want to have hundreds of moulds? I was looking at Yale master blanks online and they showed how the warding varied so that you could have various levels of master simply based on the wards. The super master barely had any material left, it was as if you took a blank and cut the grooves for all the different wards for all the keys out of it.
I wondered, what about just making something from sheet metal, especially a soft one! I quickly made a blank from some aluminium sheet, I would have used coke can but I did not have any so it is a little thicker. I spent some time forming it to fit the keyway and after a while had something reasonable. Then I tried impressioning. Obviously the key is not strong enough for the cranking part of the action so for that I used a screwdriver, I then just wiggled the key. Again the softer aluminium took the marks fairly easily, the fact it was thin also seemed to help. After a while I had a key that worked albeit with the need for a screwdriver to do the turning.
So don't lock me in a room with a coke can (and a pair of scissors and a round file and a magnifier and some pliars and a screwdriver) because I can escape!

Firing blanks?
The key with the edge made from solder worked so well but it was such a pain to actually make the blank. I decided to look at casting one. The idea was to make a mould of a normal key blank in a high temperature epoxy so that the filed down blank could then have the solder cast onto its edge. This did not work, firstly I tried to get clever with my mould making and that failed but secondly I think the approach was doomed to fail. OK, let's start with the mould making, I applied some foil tape to one side of the blank carefully burnishing it into the cuts on the side of the key. This foil would form the parting line the the mould. I coated the other side of the key in Vaseline (petrolium jelly) and dunked it into a little tube filled with epoxy. The tube was the backing from the foil tape, the epoxy was "JB weld", quite famous but it is my first time using it. 10min in the oven at around 70 and it was set. I pulled off the wax paper and sanded the sides of the block to reveal the foil tape and then split the mould with a screwdriver. It did split but the vaseline did not do a good job, possibly the heat was not such a good idea. Normally I use wax and will do in the future, that was fail part 1.


Fail part 2 involved my salvaging what I could of the mould and trying it out "by hook or crook". The result was failure. This is more than just casting, if you want the solder to really stick to the brass blank then the blank must be up to soldering temperature, this ensures the solder retains a low viscosity as it passes over the surface and wicks into the microscopic details of the brass. Otherwise it just freezes on contact or sits on the surface like a balloon full of water. But the fact that the resin is a fairly good insulator meant I could just not get the solder to flow into the mould and contact with the key, the resin also got rather soft (still awesome stuff though!). The mould also needs to be up to temp and I think the easiest way for that is if it is made from aluminium. This is possible but I am not sure if I want to go that far right now. If I did I would cut a blank in half, pop it on the flatbed scanner and create some CAD for a mould, then mill with a little ball ended cutter (I have down to 0.5mm). The mould can be a little oversize, as long as it cuts down the work, hmm maybe tomorrow.
Saturday, 28 April 2012
Leadbelly, easy impressioning
In my previous post I forgot to mention that creating the marks on the key requires a fairly good amount of force on the key, it needs to be cranked over fairly hard and wiggled quite vigorously. I held mine in vice grips but others use special holders that are somewhat more ergonomic. Key breakage is not uncommon! I struggled so much to get marks on the previous key because of the locks keyway I wondered about making life easier.

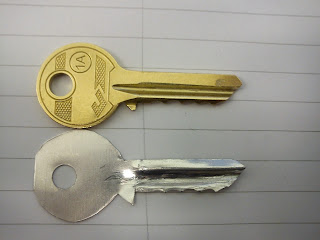
What I did was take a blank and file down each pin position to the maximum possible depth plus a little bit more for good lock. I built up the edge with lead/tin solder before finally filing and scraping it to look like a blank again. Files and solder don't really mix so I used a box cutter blade mostly with a scraping action (see cabinet scraping). Above is the finished key with heatshrink protector (so I can carry it around to show off).
Below you can see the line of the join between key and solder. The key must be up to soldering temp when you do this or you do not get good adhesion. Adding the solder was easy, but shaping it a massive pain.

The impressioning process was very easy, the wiggling could be done quite gently by hand (no clamp) and the marks could be seen from space. The lead is not ideal when it comes to filing, really I need a little modified nail clipper of something to make the cuts.
Impressive?
So, this is a key, nothing special. But I made this key, so what? I made this key for an intact lock for which I had no key! An old lock I found amongst some junk that I held in a vice but it could just of well been in a locked door. How did I do this?

I used a process called impressioning. It is simple in theory but somewhat devilish in practise at least it was for my lock. I bought a few brass key blanks on ebay and set about the task. First watching this excellent video about the process:
Jos Weyers is a world champion and he had a lot of good tips but I really had no luck at all to start with. The basic idea of impressioning is to insert the blank into the lock then crank it around to the left until its motion is stopped. It can't move any further because one of the pins will be preventing it, the pin that makes contact first (mechanical tolerance means one will contact first). You then jiggle the key up and down, unlike the other pins which move freely up and down the binding pin will be held by the pressure of the tensioned key. That pin will rub on the key leaving a mark (an impression). You repeat this turning the key to the right before jiggling and that will make another mark (as it is likely another pin sill rub). You remove the key and file the two marks away reducing the height of the key at that point slightly. With experience you do this just the right amount to take the key down to the next depth in the key/lock's official specifications.
Sounds easy but the marks are subtle, you need a fine file (mine was too course) and you need some magnification. I ended up with a tiny 45X pocket microscope bought on ebay for around £4 and I made do with my file. I wiggled, I jiggled but no marks. I take the key to work and look under a proper microscope, no marks!
After a few days I give it some thought. The lock is a decent one, a Yale and not the cheaper brass one but what looks like a steel one, at least it is plated. The key barely moves in the keyway, hmm. Out with the dremel, I remove material so that the key can move more freely up and down. I do this on all of the upper edges of the cuts on the side of the key. I try again and I get something!!! But the marks I see are nothing like those in the video above. The keyway of the Yale is very wiggly and when the blank is fresh only the side of the pins rest on the edge of the key. Instead of nice little dots I got a sort of bruising on the edges. Really the brass pins are burnishing the brass key slightly. After 1.5hrs the lock opened and it felt amazing! The hard part had really been assessing what was really a mark and what was not, my file is excellent quality but a little too course and I was forever trying to decide of something was a mark from the file or the lock. The keyway also made it difficult but mainly because I was not expecting marks like the ones I got.
I have a feeling that I chose the worst possible lock to begin learning but I learnt a heck of a lot!
Locks or puzzles, or both?
For the past few months I have been learning about lock picking after getting an email from stumbleupon suggesting the website for toool, the open society of lock pickers. And from there I found some very interesting videos by a guy called Deviant Ollam, I'm not sure that is his real name but the videos were extremely illuminating!
I discovered two interesting things; lock sport and physical security. The former is the idea of treating a lock as a mechanical puzzle and the latter is working on how to improve security and exposing problems with locks so that they may be fixed or avoided.
A lot of people would think it is a bad idea to publicise methods that could be used to commit crimes but it is clear that lock picking is generally not the method of choice for burglary and that by showing just how insecure some locks are people are more likely to choose wisely at the hardware store. An example is a small cash box I own, I discovered it could be opened with a small screwdriver and a paper clip in 3 seconds. My colleague could do the same after perhaps 10 seconds, 5 seconds of that was getting instructions from me!
So I have a few picks and a few locks and am learning a lot, it is really quite fun. It is interesting to see locks in a new light, before I thought of them as absolute seals but now I see them simply as devices, each having pros and cons and limits to its security. As my knowledge grows I feel more and more that it is my morals that keep me out than any lock. The average burgular does not have these morals or indeed the skills but he does not need them as he wields a hammer!
Tuesday, 24 April 2012
Very small houses
I really feel that if I had a large workshop (new blog name required perhaps?) with room for all my hobby stuff then I would not really need much space to actually "live" in, some of these tiny homes are really inspirational, especially given that you can often build them yourself for little money.
Subscribe to:
Posts (Atom)